By default Windows 10 automatically installs devices and download updated drivers when available. In some cases you do not want this, in which case you need to disable automatic driver updates. In Windows 10, the easiest method is to use the Control Panel.
Here are the steps:
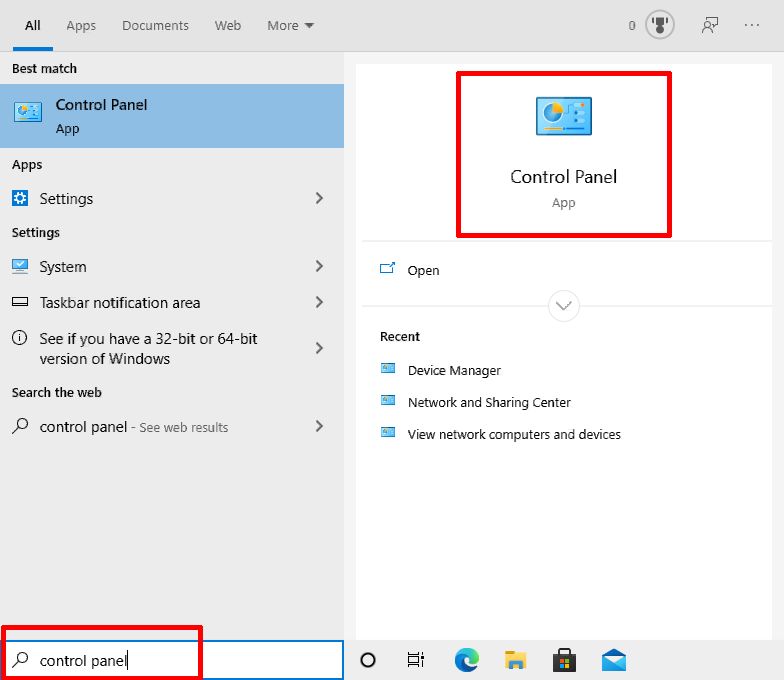
1) Open the Control Panel by typing “control panel” in the Search box next to the Start button and press Enter.
2) In the search results, click the Control Panel App to open it.
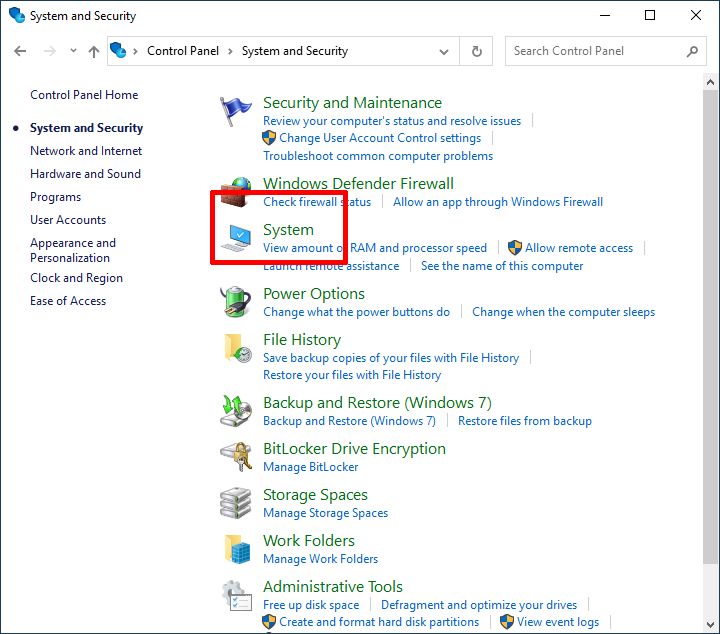
3) In the Control Panel window, click the System and Security option, and then click the System option.
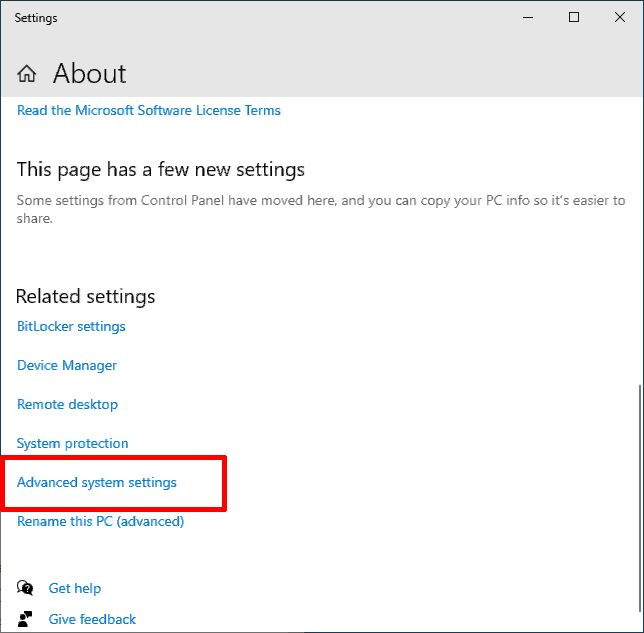
4) In the new Settings window that opens, scroll down until you see the Advanced system settings option and click it.
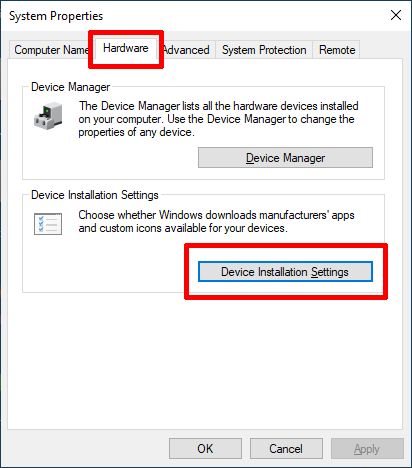
5) This will open the System Properties dialog box. Here you need to select the Hardware tab, and then click the Device Installation Settings button.
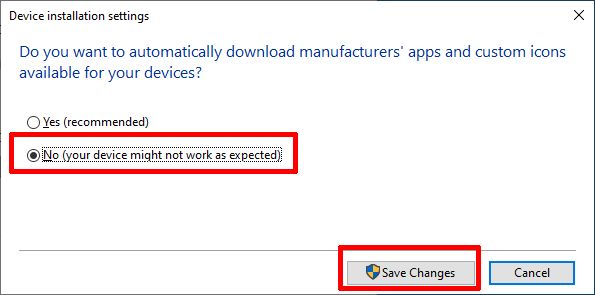
6) Now change the radio button from Yes to No, and click Save Changes.
Close all windows that were opened in the above steps and you’re done. You can now manually decide which driver you want to install for each hardware device.
In Windows 10 Pro you also can use the group policy editor
In a corporate environment you might want to use the Windows 10 group policy editor to change system settings rather than using the control panel. Note that this is not possible on the Windows 10 Home version.
The steps are as following:
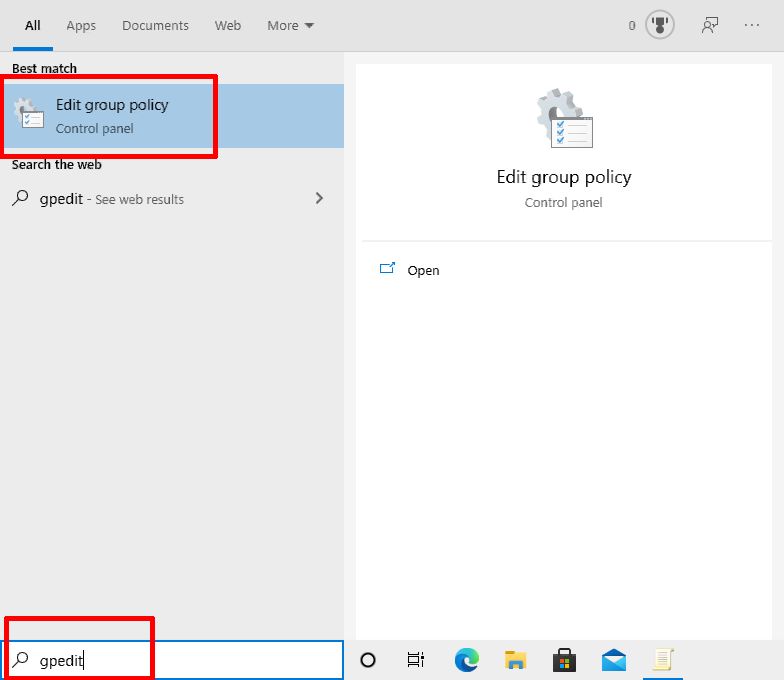
1) In the Search box next to the Start button type “gpedit” and press Enter. In the search results, click the Edit group policy Control Panel option
2) In the Group Policy Editor window, open the Computer Configuration and then open the Administrative Templates.
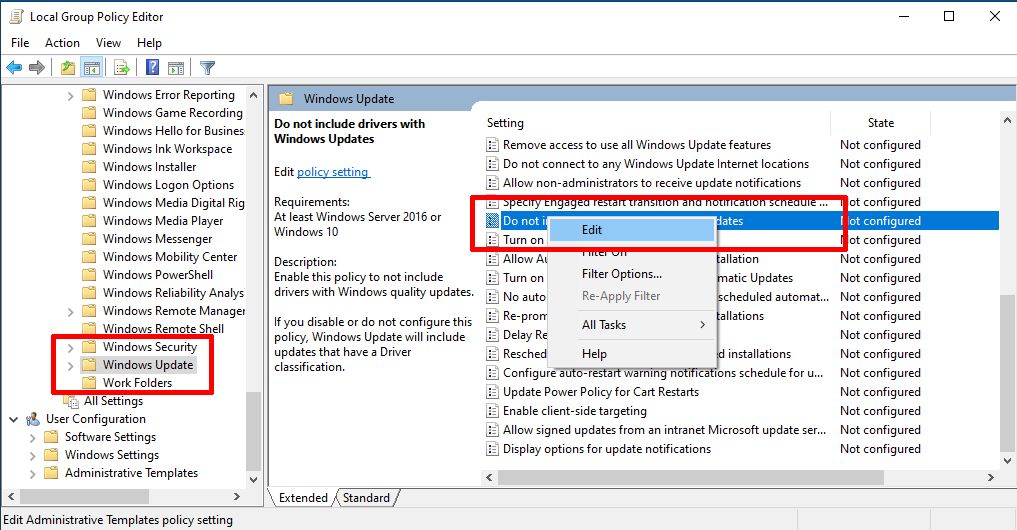
3) Next, open the Windows components, scroll down to the Windows Update entry and click it.
4) In the right-hand panel, scroll down until you see the option Do not include drivers with Windows Updates. Right-click it, and in the popup menu, select Edit.
5) In the right-hand panel, scroll down until you see the option Do not include drivers with Windows Updates. Right-click it, and in the popup menu, select Edit.
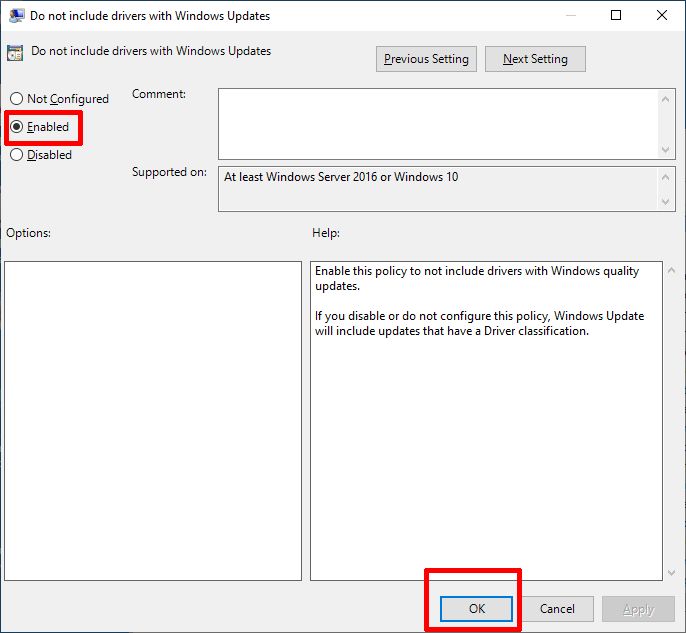
6) In the dialog box that opens up, select the Enabled radio button and click OK.
7) Close the Group Policy Editor window and you’re done.
In general, you want to keep your computer up to date, including device drivers. But if you have a driver-related problem, installing an older version can sometimes solve the issue. And in that case, you do not want Windows Update to automatically update the driver again. It could also be that there is no driver for your hardware in Windows 7, but a Vista driver works. In those cases you want to manually install it and not rely on the Windows driver update service, so just disable automatic driver updates in Windows.
Steps to disable automatic driver updates
In Vista and Windows 7 you can easily disable the automatic driver updates. Just follow these steps:
Open the Control Panel
Select System and Maintenance
Select System
Now click Advanced system settings in the left-hand panel (if the UAC is turned on, click Continue to proceed)
Next, click the Hardware tab
Click the Windows Update Driver Settings button
Now you need to select the driver update option you want to use. The default option will automatically check for drivers and update them. To disable automatic driver updates in Vista, select either the second or third option and click OK.
Use the Group Policy Editor
In some cases, this appears not to work, and then there is another method to disable automatic driver updates in Vista and Windows 7. This involves the local group policy editor, which can be started from the Start menu by typing gpedit.msc followed by Enter.
Once started, in the Local Group Policy Editor, navigate to the following: Computer Configuration -> Administrative Templates -> System -> Driver Installation.
Next, change the setting for Turn Off Windows Update Device Driver Search Prompt to Enabled. After clicking OK and closing the Local Group Policy Editor, just restart Windows and that’s it.
Since the Local Group Policy Editor is used, this second option is limited to the Professional and Ultimate editions of Windows Vista and Windows 7. The Home versions do not have this option.
For Windows 10 and Windows 11, you can also disable automatic updates using the instructions in here.
Programs that automatically update device drives on your system need to match the hardware in your system with the devices in their database. Once a match is found, they check the driver version to see if it is newer, so the update can be recommended.
That sounds pretty simple, doesn’t it?
Well, in a way it is, but it is still possible that a driver update program recommends a program that should not be installed on your system. We call this a false positive. There are two possible reasons for a false positive in driver updates, a device mismatch, and a driver version mismatch.
Device Matching Logic
To understand this, we need to look at how a device is identified in Windows. If we open the Device Manager, select a device, and then right-click it to see the Properties, we can select the Details tab. In the list of properties, we select the Hardware Ids:
The screenshot will vary depending on the Windows version, but the concept and logic are the same throughout all Windows versions.
As you can see in the screenshot, a device can have multiple hardware ids. The top one in the list is an exact match of the device, where the brand, model, type, and even revision number would match. Going down the list, the device match is broader, but still specific, that is why all these identifiers are present in the list of hardware ids.
But Windows allows for the use of compatible drivers, so that, if an exact match on the driver is not available, the device can still be used with a compatible driver. This may result in reduced support for the device, not all functionality may be available, but at least the device works.
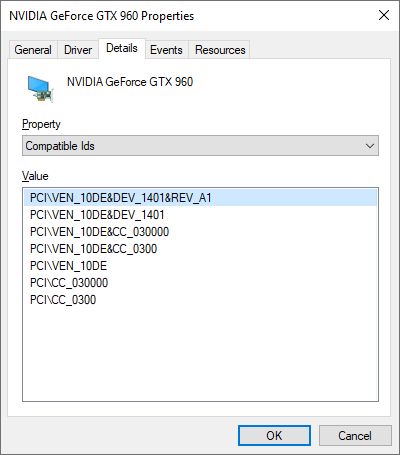
If we select the Compatible Ids in the property list for the same device, we see:
Again, we see a list of identifiers, where the top one would be the preferred match, and the lower ones are broader matches.
When a driver is needed for a device, Windows will always first try to find a driver for the device based on a hardware id match. If none can be found, a driver match based on the compatible ids can be used.
So if an existing driver has a match on a hardware id, while an update is recommended that matches on a compatible id for the device, we consider that a false positive.
Driver Version Comparison
Apart from a list of devices that are supported by a driver, a driver also has a date and version. The date and version are combined in a single identifier, like this:
“03/22/2010,6.236.0322.2010”
The first part is the date, and the second part is the version number. Windows checks for new drivers based on the driver date, the version is optional. So if a driver program recommends a driver update based on a newer version, while the date is older than the currently installed driver, this is again a false positive.
In the Device Manager, you can select the Driver tab to see the date and version of the currently installed driver:
Drivers do not always have the complete date and version information, and even the date format is not always consistent. Driver programs of course need to factor in these aspects when recommending driver updates.
Windows Version Matching
Not only should a driver match a device by supporting the hardware ID, but it also needs to be suitable for the Windows version.
Drivers that are suitable for Windows 10 will in most cases be compatible with Windows 11. The same is true for using XP drivers in Vista and Vista drivers in Windows 7 (and in some cases even in Windows 8.1).
But it is not guaranteed that older drivers are compatible with newer Windows versions. Simply trying it will tell you if they work. And even if not directly compatible, older drivers can sometimes be installed by running the installer in Compatibility Mode for the older Windows version.
For this reason it is also recommended to always make a driver backup or creae a system restore point before updating device drivers. That way, you can revert back to the previous version in case of any problems. Another option is to have an installer for a previous version of a driver on your system so that can be reinstalled in case of problems.
And as a last resort, manually installing the driver using the INF files can work.
In addition to the Windows version, the system architecture is important. Drivers for Windows 32-bit will in most cases not work in 64-bit systems and vice versa.
Programs that recommend or update drivers for your computer need to consider these aspects. False positives can happen when a program recommends drivers that are for an older Windows version but don’t work on your Windows version.
In our tests, we found DriverFinder to have the best device driver matching logic.
All hardware equipment inside and connected to personal computers uses an identifier to uniquely identify itself. This allows operating systems to recognize the device and install the necessary software for it. In Windows, this generally means that a device driver for the hardware is installed. The hardware ID for a device can be checked to locate a driver for it.
The hardware identifier is a combination of the bus type, the hardware manufacturer (or vendor), and the device identifier. In some cases, additional sub-system identifiers and revision information is included to distinguish between variations of a device.
So when you are looking for a device driver for a piece of hardware, it is useful to know the hardware id of the device. This can tell you which manufacturer made the device and help you find a device driver. Read on to find out how to check the hardware ID for a device in Microsoft Windows. The steps are valid for Windows XP all the way up to Windows 11.
Check the Hardware ID using the Windows Device Manager
The hardware id for a device in Windows can be found in the Windows Device Manager. To check the hardware id for a device, follow these steps:
Open the Device Manager from the Control Panel. You can also type “devmgmt.msc” at the Run option in the Start menu (or menu Search option for Windows 7 and newer).
In the Device Manager, right-click the device, and select Properties in the popup menu.
Next, select the Details tab.
Now select the entry called Hardware Ids in the Property dropdown list.
As you can see in the screenshot, there can be multiple hardware ids for a device. The top one is the most specific identifier, and going down, the identifiers are more generic. The reason this is done is to allow a device driver to be selected based on a match to any of these hardware identifiers. This allows drivers to be used that are applicable to variations of devices.
The hardware manufacturer in this example is NVidia, which is identified by VEN_10DE.
Obviously, this is a device for which a driver is already installed, and the manufacturer and model for the device are shown. But the hardware id is also available for unknown devices and not recognized devices. This way, the hardware id, or Windows device ID, can be used to find the correct driver for the device. If no exact match for the driver is available, you can also check out the Compatible Ids by selecting that as the Property selector.
Note: Depending on the hardware device, the number of tabs in the device properties dialog will vary. But there will always be a Details tab as used in the steps in this guide.
Programs like DriverFinder use the hardware id and the compatible id to find a matching driver for a device as well. This way these programs can find a driver for a device to match the hardware and Windows version.
FAQs
What is a hardware ID?
The hardware ID for a device is an identifier for a piece of computer hardware. Think of a sound card, or a webcam, for example. The hardware ID is vendor-specific. A hardware ID consists of a device class, vendor identifier, device identifier, subsystem identifier (different versions of the device), and a revision number. An example of a hardware ID is: PCI\VEN_8086&DEV_9A49&SUBSYS_14321043&REV_01
Revisions can be used for updates of firmware on the same device for example.
Is hardware ID the same as Device ID?
Yes, the hardware ID is often referred to as the device ID.
Is the hardware ID the same for all Windows versions?
A hardware ID is specific to a device. So, it is linked to the equipment, not the operating system. The hardware ID will not change for different Windows versions.
How do I find the hardware ID?
The hardware ID for a device can be found in the Windows Device Manager. In each version of Windows, the steps are the same. Open the Device Manager, right-click the device, select Properties, select the Details tab, and under Property select Hardware Ids. The Value shown contains the hardware ID(s) for the device.
What is the hardware ID used for?
The hardware ID is used by Windows to identify the device and find a device driver for it. Microsoft finds a driver in the repository or the Windows Update catalog. If no driver is available with Microsoft, a driver from the manufacturer needs to be installed to allow communication between Windows and the device.
What is a compatible ID?
The compatible IDs for a device are also hardware IDs. The difference is that a hardware ID is unique to a single device, while compatible IDs can apply to multiple devices. The compatible IDs identify the device as a piece of equipment of a certain category that can be used for certain functions. This is important if no unique device driver is available for a device. A driver for a compatible ID of the device can enable Windows to still communicate with the device.
Do Virtual Devices also have a hardware ID?
Yes, virtual devices in Windows also have a hardware ID. These devices also need software to function, and need to be identified as a device within Windows. Examples are:
Whenever using hardware devices in Microsoft Windows, Windows will install a device driver for each hardware device. Many devices are supported by Windows itself, especially in the latest Windows versions. But in some cases, you will need to install additional drivers. During driver installation Windows can search on the Internet for a device driver, or you will be prompted for a location where Windows can find the driver for the new hardware device.
But in some cases even supported devices are not recognized by Windows. That could be because the driver is missing or corrupt. Another option is that Windows does not look in the right place for the driver. The location where Windows looks for device drivers by default is C:\Windows\Inf (since the inf files are used to match a device with a driver).
Since the installation path for Windows can vary, this path for Windows device drivers is actually configured as %SystemRoot%\Inf. In this, the %SystemRoot% refers to an environment variable that always points to the right path for the Windows installation.
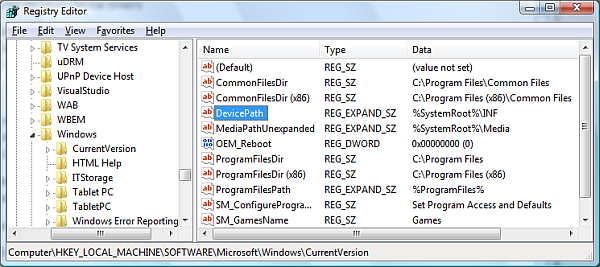
The path for Windows device drivers in the registry
The driver location is stored in the Windows registry. And the registry key that is used to store the driver path is: HKEY_LOCAL_MACHINE\Software\Microsoft\Windows\CurrentVersion\DevicePath
So if you are getting unexpected errors indicating that the device is not recognized, check the device path in the Windows registry. If the %SystemRoot%\Inf value is not present in the DevicePath, then change it to that, or add it to the path.
The DevicePath variable can also be extended with additional locations for drivers. If for example, you have a network location where you store device drivers for all PCs and hardware devices, you can add that to the variable. Just separate the path with a semicolon. E.g.: %SystemRoot%\Inf;\Drivers
OEM manufacturers also use this option to include additional drivers in the default Windows setup.
To start the Registry Editor, use the search option in the Taskbar, or press the Windows + R key to bring up the Run window and then type “regedit.exe” and press Enter.
Device drivers in Microsoft Windows can be signed or unsigned. But what is the difference, what are the risks, and how can you find unsigned drivers? Find out the answers and learn how to make sure your system is not affected by bad drivers.
Updating your Windows system is generally a good thing. Bugs are fixed, new features are added and problems prevented. Driver updates can be part of a Windows update or it can be a separate driver update. But if things go wrong after the update you want to uninstall the update. With device drivers you can use the driver roll back.
All PCs have several devices, which may be permanent features of the machine or may be connected as required. Internal devices include audio cards and disk drives while external devices include printers and scanners that may be connected all the time or digital cameras and MP3 players that are connected occasionally to transfer data between the device and the PC.
There are a large number of devices that may be connected to a PC, with numerous manufacturers adopting different standards and formats for the devices they produce. The problem is that the operating system has to communicate with each device that is connected but the large number of variations means that this is impossible to do so directly.
This problem is overcome by each manufacturer developing device drivers or PC drivers for each of their devices, with separate versions for the different operating systems. These drivers handle the communications between the operating system and the device. Laptops are simply mobile versions of the previously more common desktop PCs. They have their own devices and so also have device drivers, known specifically as laptop drivers.
Why We Need Laptop Drivers
Since laptops are mobile appliances, they are necessarily smaller versions of their desktop equivalents. This means that all their components have to be smaller and so all the devices installed in a laptop are designed specially for them. A laptop very rarely uses the same components as a desktop PC but instead has miniaturized versions of them.
The outcome of all this is that, since laptops have their own range of devices, they need laptop drivers to make them work. These have similar functionality to desktop device drivers but are designed specifically to work with mobile devices.
Of course, devices such as printers and digital cameras can be connected to a laptop in the same way that they can be connected to a desktop PC. They will have their normal drivers and so a laptop may have a mixture of laptop drivers and standard device drivers installed.
Why You Need to Update Laptop Drivers
In the same way as for a desktop PC, a laptop and all its components work best if everything is correctly installed and up-to-date. This includes all the device drivers and laptop drivers for the various devices. If you experience problems or poor performance, these can sometimes be corrected by re-installing or updating the drivers. The procedure for doing this is the same for the laptop drivers and the standard device drivers, only the source of the new drivers is different.
To install new drivers, access the Device Manager. Depending on the operating system you use, this may be available from the Control Panel or by right-clicking My Computer, choosing Manage and then Device Manager to list the types of device in the right pane. Right click each device and click Properties, then click the Driver tab to see details of the installed laptop driver.
Click the Update Driver button to download drivers and install the latest version on your PC. When you complete the process, you may be prompted to restart your computer. Choose to do this only when you have completed the process for all drivers.
You can update drivers individually by visiting the device manufacturer’s website and following the instructions there to do it. However, you will need to identify each device first through System Tools. If the whole process seems a bit long-winded, the alternative is to use a dedicated service that will download and update drivers automatically.
There are several of this type of service available and each one will generally hold a comprehensive database that contains the latest versions of all device drivers. Once you have the necessary software installed, it will identify the devices you have connected and the version of the driver for each one. A scheduled process will then download drivers as later versions become available and install them automatically. This ensures that you always have the latest version of device drivers installed, avoiding problems and making sure your computer and its devices operate efficiently together.
Problems with device drivers can be hard to solve. Possible conflicts, driver versions, device incompatibility, they can be quite annoying. If you want to clean up your system and prevent problems caused by unused devices, try removing the device drivers for such devices. Here is how to remove unused device drivers from Windows XP or Vista.
Not all computer hardware has Vista drivers available and some hardware devices might not work under Vista as a result. If you can not find Vista drivers, you can try installing the Windows XP drivers for the device in Vista. In some cases the XP drivers work fine in Vista. Here is how to do it.